Thursday, December 27, 2012
Color Explained
This is a beautifully animated short about the physics of color. It also happens to explain why Metalheads don't come out in the sun.
Wednesday, December 26, 2012
Melting Bones
Any decent Victorian garment is going to need bones. I'm making a quick bustier for one (quick is the important word here), so I'm using that plastic boning that comes in a roll. The directions advise that you cut the ends to round them, but I find that it's very difficult to get them smooth. They catch in the casings and are a complete pain. But I tight to myself, there's no reason I couldn't get the help of my friend, Fire!
I removed the bone from its casing, and cut it into a roughly roundish shape.

Hold it in the blue part of the fire for a couple of seconds. If you hold it in the yellow part, it will get sooty. (I learned that in chemistry class. I don't play with fire quite THAT much.)

You'll see the edges start to soften.

While it's still warm, press the end against the table or your finger to smooth it.

Slipping your bones back inside their casings will be a dream!
I removed the bone from its casing, and cut it into a roughly roundish shape.
Hold it in the blue part of the fire for a couple of seconds. If you hold it in the yellow part, it will get sooty. (I learned that in chemistry class. I don't play with fire quite THAT much.)
You'll see the edges start to soften.
While it's still warm, press the end against the table or your finger to smooth it.
Slipping your bones back inside their casings will be a dream!
Tuesday, December 18, 2012
Snowblind
Unfortunately, this post has nothing to do with actual snow. It's 50 and raining here in the Midwest. Whatever that's about. Fortunately, this post is a handy painting tip I just learned from my sister. My sister who hates painting. Why this didn't come from anyone else I know, I have no idea, but it's good so I'm sharing!
Back in school, I was taught that white paint was pretty much evil. It killed all the transparency in an oil paint. Rather than mixing it with other paints to make them lighter, one should lay out all the values on your foundation layer, lay down thin glazes of color letting the lightness come through where necessary, and hitting the super bright spots with white at the very end of the painting. This is a very traditional way of painting, and somewhat similar to a watercolor approach. I tend to like my paintings to have more energy, be less polished, show more brush strokes. Doing both is a pain.
But my lovely sister gave me this clue: use Zinc white instead of Titanium white. Think about it. What's in natural sunblock? Titanium oxide. The stuff blocks light. But not Zinc! Mixing with this will lighten your paint, without making it pastel and opaque. (I can't tell you how many times she said "I can't believe you didn't know that!") But now I do, and so do you!
There are many other white pigments as well. Windsor Newton even has this article on the subject: Choosing the White that's Right in Oils. I think I'm going to pick up small tubes of various ones and test them. What have your experiments taught you about white paint?
Saturday, December 8, 2012
Tricks for Tonal Value
For any artist, there are things we can handle instinctively and things we have to think about a little more. For me, including a full and dynamic range of value takes more time and thought. Thankfully, I had a painting teacher who was full of fun tricks, who gave me this idea.
I took a plank of luan, and gessoed one side of it. I marked the center and taped it off. I then painted one half of it a middle grey (a 1:1 mix of black and white). After it was dry, I centered the glass with the wood extending past the glass about 1/2 inch on all sides, and caulked it into place. This is then what I use as a palette. As I mix paints, the grey helps me judge the value of these colors. Everything looks dark against white, so the grey lets me see whether it's on the light or dark side of center.

The same teacher had other interesting ideas, like
Another one of his tips was that if you use five evenly spaced values, we will interpret a full range. Just five. I try to make my big compositional decisions based on those five values.
Thanks, John Stewart! Take a look at his faculty page on the school's site.

I took a plank of luan, and gessoed one side of it. I marked the center and taped it off. I then painted one half of it a middle grey (a 1:1 mix of black and white). After it was dry, I centered the glass with the wood extending past the glass about 1/2 inch on all sides, and caulked it into place. This is then what I use as a palette. As I mix paints, the grey helps me judge the value of these colors. Everything looks dark against white, so the grey lets me see whether it's on the light or dark side of center.

The same teacher had other interesting ideas, like
- Marking a complete value scale on the palette
- Marking lines or sections by which you could measure paint, to allow for accurate reproduction of mixed colors
- adding a color wheel to the palette
Another one of his tips was that if you use five evenly spaced values, we will interpret a full range. Just five. I try to make my big compositional decisions based on those five values.
Thanks, John Stewart! Take a look at his faculty page on the school's site.

Friday, November 9, 2012
Motorcycle Jacket Love
I have a new painting project, but it's in its very earliest stages. I'll let you know more once it's gestated a bit. But the idea behind it is to spread some positivity around, cause we need it. The world really needs it!
My next sewing project is equally exciting! I saw this lovely motorcycle style jacket by ttnora, and fell in love. And was inspired!

Rachel happens to be in the market for a jacket, and I thought this would be perfect, if made from sweatshirt fleece! That's what the wool reminds me of in these images, and that's probably Rachel's favorite thing to wear. So, I'm buying the pattern today. :) Excite!
My next sewing project is equally exciting! I saw this lovely motorcycle style jacket by ttnora, and fell in love. And was inspired!
Rachel happens to be in the market for a jacket, and I thought this would be perfect, if made from sweatshirt fleece! That's what the wool reminds me of in these images, and that's probably Rachel's favorite thing to wear. So, I'm buying the pattern today. :) Excite!
Monday, November 5, 2012
Ritual Reset
The beauty of having a dedicated work space is that all of your supplies can be out, within arms reach at any time. You can throw scraps of fabric on the floor, leave your easel set up, leave brushes and paints out, so you don't have to spend an hour prepping for work the next day. But when the project is complete, things tend to look a little.... chaotic. I find that this state of disorder makes it nigh on impossible to start a new project. I get distracted by the mess, or the old thoughts. To solve this, I have a little ritual I call "resetting."
By reset, I mean clean. I don't like it, but it helps. See, I really do like when things are tidy. The process is not enjoyable, but the result sure is! So things look nice and fresh and inviting when I go into the studio. It also clears the residue of the last project, physically and mentally. Taking a break from the creative process lets my brain rest, or start planning the next project. And in those difficult starting phases of a new project, there are fewer distractions.
In my last reset, I found some missing nail polish, a box of Redbull, and a couple of missing sketchbooks. It's like finding treasure!
What sort of rituals have you found in your work?
Sunday, November 4, 2012
Black as Night, Red as Blood
Hello readers!
I've been busy sewing on a deadline. This latest piece was commissioned by a friend of mine, to match the band Steam Powered Giraffe. The deadline snuck up on me a bit, but I was able to complete it in time for her to attend their concert. It's name is completely unrelated, however. Because of its colors, the fact that I completed it Halloween night, and I STABBED myself more than I have on any other project of any kind, I call it Blood Sacrifice.
When I fitted the muslin, I installed a zipper in the front. She wanted to keep it, instead of a busk. In order to give it extra structure, I inserted a half inch bone on either side of the zipper, and it worked just fine. Later, I also found countourcorsets.com, selling corsets for serious tight-lacers, many of which had zipper closures. I had been worried that a zipper wouldn't handle the tension well, but that site disappeared my worries there.


 I used Ageless Patterns #1042. These patterns assume that you know a bit about corsetry, and a good deal about sewing. Other than the slight confusion about which seams matched, I didn't find the minimal instructions to be a problem. It turned out quite well, actually! And my friend was pleased enough that it made those many, many, MANY pin-pricks worth it.
I've been busy sewing on a deadline. This latest piece was commissioned by a friend of mine, to match the band Steam Powered Giraffe. The deadline snuck up on me a bit, but I was able to complete it in time for her to attend their concert. It's name is completely unrelated, however. Because of its colors, the fact that I completed it Halloween night, and I STABBED myself more than I have on any other project of any kind, I call it Blood Sacrifice.
When I fitted the muslin, I installed a zipper in the front. She wanted to keep it, instead of a busk. In order to give it extra structure, I inserted a half inch bone on either side of the zipper, and it worked just fine. Later, I also found countourcorsets.com, selling corsets for serious tight-lacers, many of which had zipper closures. I had been worried that a zipper wouldn't handle the tension well, but that site disappeared my worries there.


Monday, October 29, 2012
Three Lessons on Bias Tape
If you've ever sewn anything, you've probably had a need for bias tape. Making your own creates a lot more options for whatever your purpose is. I needed to make some to use as bone casing for my friend's corset. I'd never made it before, but there's never a better time than when you have a very specific need!
I saw a tutorial like this one, that seemed like it would save some work, allowing me to create really long strips of bias tape.
Lesson 1: when drawing your lines, mark the wrong side!
I marked the right side, and had trouble lining up my marks properly, had to turn the tube to cut it, and found out that well, my lines were not aligned. *sigh* I eyeballed it as I cut, and got some decently even strips.
Lesson 2: Use a low-steam setting on your iron, or get one of those handy little bias tape folders. I was doing this ally by hand, and earned some steamed fingers. Ouch!
Once I got all my bias tape made, I realized that I'm going to have a bunch of little seams, that may interfere with inserting the boning. Not good, but I'll have to make do. But today, I found this:
Lesson 3: You don't have to have squares to make the bias tape!
I was thinking about this as I was cutting up my limited amount of fabric into chunks, but I'm not a math/geometry wiz. I wasn't going to try anything, not with my fashion fabric, at least. This one will be mighty handy next time! Plus, the blog is called The Dread Pirate Rodgers! Cute pun, great reference, excellent tutorial!
May you take these lessons I learned the hard way, and use them.
Wednesday, October 17, 2012
Drawings from the Danger Booth
I always come back from one of Rachel's conventions feeling inspired. That's enough of a reason to keep going. So, I drew this picture of myself being goofy. He photo was taken in a prank photo booth with a friend. It's an interesting challenge to draw a strang expression. You can't assume things. Maybe that's why this sketch came together so quickly.
Have some fun!
Be silly!
Take photos! Maybe you'll find yourself in the Danger Booth, too. ;)

Have some fun!
Be silly!
Take photos! Maybe you'll find yourself in the Danger Booth, too. ;)
Friday, October 5, 2012
Making Madness
What have I been making lately? A lot, actually! My own deodorant (after a terrible breakout from the one I bought from Lush,) a new purse, a lot of artwork for my friend's movie, a corset for another friend, and food. Lots of food! Friend, memories, and plans to travel to NY. So here's to marathons of crazy busy madness, because sometimes you need it.
Monday, September 17, 2012
Higasa (Parasol) Purse
A long time ago, I saw some fabric at Jo~Ann Fabrics, and I loved it. It was Japanese style parasols, and I had to have it. But I did not buy it, because I had no idea what to make from it. When my purse snaps finally gave out, I knew what I needed to make! I bought a yard of that lovely parasol print, and had everything else!


The slits I made for the magnetic snap tabs tore...

and the non-fusible interfacing came out along with the snap.

I thought that fusing the interfacing, or in my case, sewing it to the fabric might prevent this issue. So I sewed it on to the lining in a little square. I also used an awl to create the holes instead of cutting the fabric, for a bit of extra durability.

 |
| The square distorts a touch, from forcing the tabs through the holes. |
The color is not quite right in these pictures, so I'll try to get a more accurate one later.
The orange lining is INSANELY bright.


This thing is also HUGE compared to what I'm used to carrying. We'll see how that turns out...
Monday, September 3, 2012
Labor Day Fabric Findings
Sme time ago (I'm not sure how long, but it's been a WHILE), I purchased the Bombshell dress class from Craftsy. Much more recently, I decided to actually start making the thing. The pattern is too small, and even after sizing up, still required significant adjustments. It was a process. Io'm still learning this fitting business, too, so it's taken a lot longer than I would have liked. But finally, I' comfortable with the bodice fit.
Rachel, and I ran all over town today with a friend of ours. I needed other opinions about fabric. After wandering through most of the prints in the store, I pulled out a bolt of fabric that all three of us liked. I was clear that this was the fabric for my dress! Finally! I'm very excited. Won't it be lovely?


Rachel, and I ran all over town today with a friend of ours. I needed other opinions about fabric. After wandering through most of the prints in the store, I pulled out a bolt of fabric that all three of us liked. I was clear that this was the fabric for my dress! Finally! I'm very excited. Won't it be lovely?
It's just warm enough to work for autumn and winter, but will do well year-round.
I also. Picked up this. Fabric that I've been eying for a long time. I had no idea what to make with it. It ju st do happens that my purse is on its last legs, and I think this will work quite well. Hooray for new fabric and projects!
Saturday, August 25, 2012
iPad Painting
We finally broke down and boughty an iPad. It's almost like we're as savvy as people our age are expected to be! Naturally, we downloaded all the social media apps and games first. But shortly after, we started the hunt for painting apps. So, I present to you my first ever iPad painting!

I'm still figuring out how to do everything. (I'm a PC person. Shh, don't tell!) I'm super excited to have a reference image provider in my studio now. I have a sneaking suspicion you may see a lot more posts about art from me now. I feel really good about that!
Happy Saturday!
Thursday, July 26, 2012
Food Adventure: Mini Chocolate Chess Pie
Over the Independence Day holiday, a friend introduced me and Rachel to Chocolate Chess Pie. Specifically, this recipe from Crunchy Rock. A Little Bit Crunchy, A Little Bit Rock 'n' Roll. How cute a tag is that? I actually had to track it down by going through an image search. Once you see it, you'll understand. Anyway, I decided it was finally time to try my hand at it.
Rachel and I have found that making mini desserts is a lot of fun. They're cute, they're self-contained, and they make it easier to resist overindulging. Ok, maybe not, when it comes to THIS pie. Still, I tried my hand at a mini pie.
Since I don't have a food processor, I bought graham cracker crumbs, instead of whole crackers. The recipe on the container said 1 1/4 cup of crumbs for a pie crust, but I might go to 2 cups, next time. I used between 2 and 3 tablespoons of the graham cracker crust mix for each space in a muffin pan. I got 8, but two without sides. There was the perfect amount of filling for 8 pies.
My crust got a little charred, and I only baked it for about 10 minutes in the pre-bake, and the whole pie for 12. The filling could use some more time. Leave it to me to research mini pie crusts after I make one. People suggest baking the crusts for 3-5 minutes. I think the filling could use a full 15-20 minutes.
So what's the most dangerous thing about this recipe? The ingredients are so basic that you will likely always have most of them on hand! The recipe suggests serving with whipped cream or powdered sugar. I think serving it as-is with a glass of milk or cup of coffee is a moment of sweet perfection. :)
Enjoy!
Tuesday, June 26, 2012
Returning to Paint
So, there was only like... four months between these two photos. But I'm painting again, and it feels FANTASTIC! I might be taking a break from sewing. Or I might just have to finally figure out how to balance them. Like sew tomorrow night, while this thing is drying. But painting, it's seriously awesome. :)


Sunday, June 10, 2012
Finished Blouse - Burdastyle Handbook
Here's my finished blouse!

First, I made a muslin, using the seam tracing technique. I picked it up from Gretchen Hirsch's Sew Retro class, on Craftsy. I haven't made that dress yet, but I watched the whole class!

I made my alterations to the pattern (changed it to a V-neck).


I finished the neckline with an applique stitch, and clipped away the rest of the facing. You could see the whole thing through the sheer fabric, and that was not pretty. This is!

And lastly, I learned that there is a reason for black interfacing. I used white initially, and you could see it. It looked weird (below). I removed the cuffs, used black interfacing for new ones, and holy moly, does it look better!

Many many lessons learned working with sheers. I'd encourage anyone to give it a try! Just make sure you buy a little extra fabric. :)

First, I made a muslin, using the seam tracing technique. I picked it up from Gretchen Hirsch's Sew Retro class, on Craftsy. I haven't made that dress yet, but I watched the whole class!

I made my alterations to the pattern (changed it to a V-neck).

I used a lot of basting to keep everything in place while I worked. This was slippery floaty fabric!

I finished the neckline with an applique stitch, and clipped away the rest of the facing. You could see the whole thing through the sheer fabric, and that was not pretty. This is!

And lastly, I learned that there is a reason for black interfacing. I used white initially, and you could see it. It looked weird (below). I removed the cuffs, used black interfacing for new ones, and holy moly, does it look better!

Many many lessons learned working with sheers. I'd encourage anyone to give it a try! Just make sure you buy a little extra fabric. :)
Friday, June 1, 2012
Studio Makeover
My birthday was on Memorial Day this year. I took a couple of days off (5 day staycation FTW!), and my dad built me shelves for the studio closet as my gift. Apparently I've become difficult to shop for, but this was a life-changer, people!
I started with two shelves (only two) with space-consuming supports. I don't have any before photos, as I was way too eager to improve it. There's plenty of space in this closet, but I had to stack stuff. That means that if I wanted something on the bottom of the stack, it was a royal pain to get to. I had a bunch of fabric totes, and figured that 12 inch tall shelves would accommodate either the totes or books, so that I could get rid of the bookshelf.
Dad and I figured out how deep I wanted each shelf and how much lumber we would need. We used the laser level that my uncle gave me for the first time to mark where each shelf needed to be. (This closet is not plum or square ANYWHERE!) Two sheets of plywood, a couple of 1x3"s, and a gallon of paint later, I had a bright white closet with lots of shelving!
It took me a couple of days to figure out exactly where I wanted everything. I have one box of fabric that hasn't made it back into the closet, but that's just more incentive to actually turn it into clothing. I think most of it is flannel, intended for pajamas, anyway. I emptied the bookshelf, and rearranged, and well, the studio is about twice as big. Plus, I can have sewing and painting projects out at the SAME TIME!
The biggest benefit: when cleaning is easy, stuff gets put away! I think this probably cost my dad about $100 for all the lumber and paint, and it seriously changed my world.
I started with two shelves (only two) with space-consuming supports. I don't have any before photos, as I was way too eager to improve it. There's plenty of space in this closet, but I had to stack stuff. That means that if I wanted something on the bottom of the stack, it was a royal pain to get to. I had a bunch of fabric totes, and figured that 12 inch tall shelves would accommodate either the totes or books, so that I could get rid of the bookshelf.
 |
| The sort-of-before. This is all the shelf space I had. |
Dad and I figured out how deep I wanted each shelf and how much lumber we would need. We used the laser level that my uncle gave me for the first time to mark where each shelf needed to be. (This closet is not plum or square ANYWHERE!) Two sheets of plywood, a couple of 1x3"s, and a gallon of paint later, I had a bright white closet with lots of shelving!
 |
| After - lots of shelves, no more stacking stuff! |
 | |
| Feel free to ignore the cross stitch teddy bear. I think I made it in middle school. |
It took me a couple of days to figure out exactly where I wanted everything. I have one box of fabric that hasn't made it back into the closet, but that's just more incentive to actually turn it into clothing. I think most of it is flannel, intended for pajamas, anyway. I emptied the bookshelf, and rearranged, and well, the studio is about twice as big. Plus, I can have sewing and painting projects out at the SAME TIME!
The biggest benefit: when cleaning is easy, stuff gets put away! I think this probably cost my dad about $100 for all the lumber and paint, and it seriously changed my world.
Sunday, May 27, 2012
Woman In Black
Last night, I took the Woman In Black blu-ray to my parents' house, and made them watch it. (It's fun to scare my mom. What can I say?) I decided that this will most likely be my Halloween costume this year. I've slacked HARD these last couple of years, and I really need to make up for it. So the 2012 version of the film is set in the Edwardian era, which is roughly 1890 to 1918. I made an Edwardian corset this winter, which would be perfect to wear under my mourning gown. Except that I'm not sure what style the Woman In Black's clothing is.
I've been scouring the interwebs all morning for good images of the costume, but there don't seem to be any. I found this silhouette from behind, which tells us that the skirt isn't super voluminous, and neither are the sleeves. From what I can tell (and please correct me if I'm wrong), that points to the Edwardian era.

But then, there are these, which look more like Victorian clothing to me.


This photo, the adopted parents with Nathaniel, also look like late Victorian clothing.

The timeline in the story is a little fuzzy, too. I'm not sure how long ago the woman died. I might go watch the movie again, to see if I can find dates on the death certificates in the movie. At least it would give me a solid starting point. I'd really like to find the costume test shots, but that would decidedly ruin the ghostliness of the Woman, for those who haven't seen the film.
Tuesday, May 8, 2012
Seams in Sheers
My chosen project from the Burdastyle Handbook is the blouse, and I'm doing it in a sheer fabric. It's going beautifully, but I should have done a bit of research first. The seams are not very attractive, and I need to find a way to fix that. Had I planned ahead properly, I would have found that there are a great number of ways to finish seams in sheer fabric, and that the most preferred is the French Seam. That involves sewing the pieces with the wrong sides together, which is not what I have done. So, I'm going to attempt a false French seam with only a 1/2" seam allowance. It will be slow and tedious, but hopefully the results will be worth it!
The Cutting Class has a very nice illustration of French seams. I think I'm going to look a little more closely at the rest of their site, too!
Threads has some interesting alternatives that completely hide the seam allowance, leaving nothing more than a tiny band of color in its place. Kind of wild, really.
And I seem to remember something about adding a flesh colored piece of fabric to the inner side of a seam to hide it, I think from Gretchen Hirsch, but I'm not sure. If anyone finds that tip, please let me know!
Wish me luck!
Tuesday, May 1, 2012
H&M Sweatshirt Peplum Blazer
What the heck is a sweatshirt peplum blazer? It's the best way I could describe this jacket, which I found at H&M.
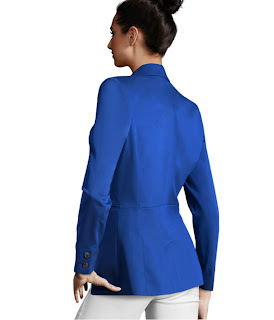
Actually, I'm not certain it was this exact blazer, but the one I saw was so lovely! It was made of sweatshirt material in bright primary red or blue, with big buttons, and princess seams. Naturally, they didn't have it in my size. I'd probably have tried to make it, even if they did... Anyway, I think this is a comparable pattern:

Or this:
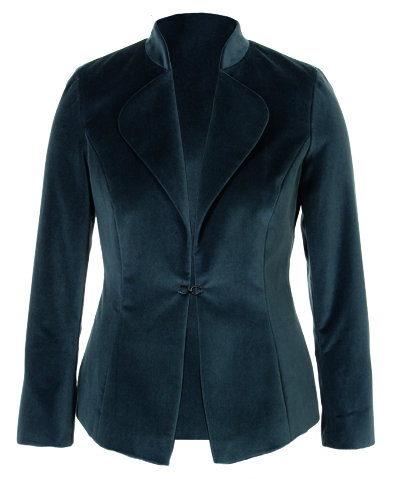
They each achieve a similar shape, but without the seam at the waist! And who doesn't love a nice long line?

Actually, I'm not certain it was this exact blazer, but the one I saw was so lovely! It was made of sweatshirt material in bright primary red or blue, with big buttons, and princess seams. Naturally, they didn't have it in my size. I'd probably have tried to make it, even if they did... Anyway, I think this is a comparable pattern:
Or this:
They each achieve a similar shape, but without the seam at the waist! And who doesn't love a nice long line?
Monday, April 30, 2012
The Burdastyle Sewing Handbook
Well kids, I finally picked it up. Actually, Rachel bought it for me. The lady at the wonderful Sew To Speak said that if for any reason I didn't like it, she'd buy it back from me.
The book starts with a section for beginners. It describes sewing tools, and tells you what you should have in your kit, shows you how to handle sewing machine, and goes over different stitches. I didn't realize that a book that covers altering patterns would also deal with beginner sewing tips. This plus 5 patterns, 3 variations of each, and the book's only $30? It's worth it!
I haven't yet finished my project, but I started with the top. I was going to purchase a blouse pattern from their site anyway, and this had three! They encourage playing with and varying the pattern. The only thing I might like to see more of is how to tell what to adjust. But then, maybe I'm not there yet. I was amazed at how fast my muslin went together, and I'm super stoked to try the other patterns!
Perhaps the most valuable thing I have learned, however, is that a 6x19" piece of one sided transfer paper just won't do. This is the first time I've ever used it, and frankly, I'm not impressed with what I got. Just some Singer brand stuff from Jo-Ann. I really need to order something bigger. You don't want to have to shift the tracing paper between your pattern and fabric, and trust it not to move!
Anyway, I'm pleased with the book. Order it here or at your local shop!
Happy sewing!
Thursday, April 26, 2012
Anathema - Getting Down to the Wire!
I promise I'll get back to regular scheduled programming soon. But for now, I need your help. Rachel's kickstarter has only 4 days left, and we still have $1200 to raise! Please, please please spread the word! Even if you don't like horror or plan to pledge yourself, repost somewhere. It would mean the world to me!
Here's the link to her marvelous lesbian werewolf epic fundraiser!
It's basically a pre-order of the comic, with some added rewards like original artwork from the artist! Now seriously, who doesn't want original art? But it doesn't even get a chance if the funding isn't reached! Make her dreams come true!
Tuesday, April 17, 2012
Drawstring Backpacks
Remember how I said I found my evil twin? Well, we hatched a plan for some of those draw-string backpacks. Naturally, I can't share with you the full plan, but I will share this tutorial! They've been super popular, and are clearly simple to make. Material Girls does a great job of explaining, and makes a rather high quality version. So cute!

Saturday, April 14, 2012
Found: My Evil Twin!
Hello, friends! I have, at this convention, met my evil twin. She decided she was the evil one, so it's ok. Anyway, we have been feeding each others' madness, and we have devised many, many wacky ideas. I may just share them with you, too! We're talking bags, necklaces, clothes, hair, all kinds of stuff. The world just may not be able to handle us working together. Mwahaha. I'm even determined to make a pretty version of the shower curtain rings in our hotel. See, they are the easiest things to open in the world! Amazing.
Wednesday, April 11, 2012
Anathema Still Needs Your Help!
Anathema is nearly half way funded, but Rachel still needs your help!
She's got five issues, FIVE to fund with this thing. I know what's coming and let me tell you, it's going to be an exciting ride! Forbidden romance, action, mystery, Monsters created by a monster fanatic? What more could you possibly want?
Now, I know some of you are probably thinking that comics are for kids, or for geeks, or are wondering how you even read one. Let me tell you though, that it's an amazing way of telling stories. You see, like a film, you have the option of telling things with words, or with pictures. Rachel's got this incredible way of selecting which tells what, for the best results. She wrote one comic for an upcoming anthology in which all the text comes from actual letters, but the story is told in pictures. Glorious!
We're going to be at C2E2 this weekend, promoting this thing. She's only got a couple of weeks to raise the remaining $10K! So please help!
Why would a person need to raise that much for a comic, you wonder?
Well, it's like this: Rachel is not an illustrator, so she has to hire one. He'll do an 11x17 drawing for each page. There's 22 of those per issue. Then, because the illustrator only does the pencil and ink, you have to hire someone else to color those. It's a basic fact that there is a LOT of work involved. Christopher Mooneyham is the artist, and he's stellar. Check him out!
Friday, April 6, 2012
New Projects!
I hate a good bit of my clothing at the moment. I've decided to try to make as much of my clothing as possible, mostly so that it will fit properly. I've been scouring BurdaStyle.com for pieces I think I could pull off, and would actually wear. The first one I found is the short sleeved blouse.

I don't think I would have chosen it, except I found this fabric at Jo-Ann last night:

This is a beautiful sheer (unfortunately polyester) chiffon, with velvety pink dots. I can't wait to sew it up! But, it's going to have to wait for a couple of weeks. We're going to Chicago next weekend, and Rachel has asked me to alter some T-shirts, so they're cuter. I tried to find some black jersey last night, but that's impossible to find. Why? WHY?
I did stumble across some fabric which will be a PERFECT print accent for the family room. Observe, a day in the garden:

The brown matches our couch, and the blue is the color we've chosen to tie the whole house together. Hooray! I picked up the last two yards, because I just knew it wouldn't be there if I didn't.
I think I'm going to have to do white for the main part of the curtains, just to brighten the room. And then I'll line them with block-out, to keep out the light. Haha. Paradoxical.
I don't think I would have chosen it, except I found this fabric at Jo-Ann last night:
This is a beautiful sheer (unfortunately polyester) chiffon, with velvety pink dots. I can't wait to sew it up! But, it's going to have to wait for a couple of weeks. We're going to Chicago next weekend, and Rachel has asked me to alter some T-shirts, so they're cuter. I tried to find some black jersey last night, but that's impossible to find. Why? WHY?
I did stumble across some fabric which will be a PERFECT print accent for the family room. Observe, a day in the garden:
The brown matches our couch, and the blue is the color we've chosen to tie the whole house together. Hooray! I picked up the last two yards, because I just knew it wouldn't be there if I didn't.
I think I'm going to have to do white for the main part of the curtains, just to brighten the room. And then I'll line them with block-out, to keep out the light. Haha. Paradoxical.
Sunday, April 1, 2012
Anathema Continues!
Rachel just launched her kickstarter for the rest of Anathema, and it's off to a splendid start! I couldn't be more pleased, or proud, or excited!
Thank you for allowing me to shamelessly plug her!
Thank you for allowing me to shamelessly plug her!
Thursday, March 22, 2012
Plea for Help - Finding Fabric
Columbus, Ohio, is called a "little big city." But there's a problem. It's really hard to find quality fabric made from natural fibers. Why? I have no stinking clue. If you do, it's in one of those quilt shops. (It's still fairly country around here, no matter how we try to deny it.) That's fine, but I want to make garments, not quilts.
I'm looking for cotton or cotton blend knits that don't have pink bunnies on them. I prefer to buy fabric in person, but I'm not unwilling to order it. So does anyone out there have a good source? I would be forever thankful.
I'm looking for cotton or cotton blend knits that don't have pink bunnies on them. I prefer to buy fabric in person, but I'm not unwilling to order it. So does anyone out there have a good source? I would be forever thankful.
Monday, March 19, 2012
Best Spray Paint Ever!
We have been working nonstop on this arcade, and I haven't posted a single photo of it! It's really Rachel's project, and perhaps that's why. Rachel let me have a day off yesterday, so I got some much needed errands done. (I was waaaaaaaay overdue for an oil change.) We bought a phone and dodged a hail storm. I haven't been to my grandmother's house in a month, and she will soon DIE of grief from it.

We're going back over to the folk's house (AKA workshop) tonight, and I think we'll have most of the physical part finished. Save maybe drilling all the holes in the control panel top for the buttons.
This thing is a BEAST!
If you ever, EVER need to spray paint something black, or any color, buy Krylon Dual.

We painted a couple of pieces of furniture black before, but never with such ease! It covers really well, and the way the nozzle is designed makes it easy to press the sprayer button, too, so your finger doesn't die. Two or three coats = an amazing finish!
Someday I'll get that knitting needle post up. Until then, buy a can of this, and enjoy!
So, dear readers, this is the cause of all that:
The Nightmare Arcade. (That is, Nightmare-like-the-comic themed. Because everything Rachel is horror and comics.)

We're going back over to the folk's house (AKA workshop) tonight, and I think we'll have most of the physical part finished. Save maybe drilling all the holes in the control panel top for the buttons.
This thing is a BEAST!
If you ever, EVER need to spray paint something black, or any color, buy Krylon Dual.
We painted a couple of pieces of furniture black before, but never with such ease! It covers really well, and the way the nozzle is designed makes it easy to press the sprayer button, too, so your finger doesn't die. Two or three coats = an amazing finish!
Someday I'll get that knitting needle post up. Until then, buy a can of this, and enjoy!
Monday, March 12, 2012
Arcade Weekend
With the weather starting to break, and my dad recovering from this winter's surgeries, we've been working like crazy on the arcade machine!
The computer's been built, and we currently have it hooked up to the TV so we can play it. We spent the entire weekend cutting out the MDF for the cabinet. The plans, well, they leave something to be desired. You might be smarter than us if you try to make one yourself, and buy the templates.
But hey, it's going to be worth all the frustration. It will definitely make up for it with the fun it shall provide!
I'm going to check out a specialty woodworking shop after work today to see if they have some hard-to-find tools. Fun!
Thursday, February 23, 2012
Objects are Not As Close as They Appear
You know you get excited about a project, and you have these grand ideas for how much you'll accomplish on them? You know that feeling when you don't accomplish that much, and it's not because of you? Well, Rachel and I each felt this on consecutive days.
We started building Rachel's arcade machine. But MDF is very, very very dusty, and my dad decided he didn't so much want his basement covered in microscopic glue and wood particles. I don't blame him. So, we have to wait for him to recover from the surgery he's having today (he's the woodworking genius), and a sunny, rain-free day that we can cut this stuff outside. It's February in the Midwest. That means it could be a while. Rachel ordered the computer parts yesterday.
I finished the embroidery on my corset yesterday, and laced the whole thing up, thinking it was now wearable, if not finished. How wrong I was! My ribbon was too wide to fit easily through the grommets, and only one-sided. To solve that, I folded it in half, and stitched it down. It got a little wavy, but it was uniform enough that I didn't think it would be a problem. In truth, it looked fine when I laced it. The thing is, in altering the ribbon this way, I must have also shortened it by quite a bit. A big enough bit that I am now unable to put on my corset! Now that I think about it, it was probably that I skipped grommets when I was doing the fitting, so I wouldn't have to do so much lacing and unlacing. Gah.
I guess I will try to find the right color ribbon in the right size. I'd rather not put white laces on my already white corset, but I may have to. I was hoping I would get away without having to unlace that darn thing again. Oh well.
Lessons learned.
Wednesday, February 15, 2012
Living Color
Color is important. We can see it because at some point, it helped us survive. It affects our mood, stimulates our mind (and our appetite), warns us of danger, and tells us of health. Plus, it makes things interesting to look at. I have come across a lot of opportunities to choose colors recently, ones that I thought would be easier.
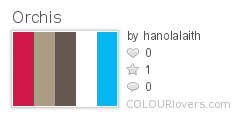
For our living room, we have decided, finally to go back to our original thought: grey. Our first greys were very cold, and blue. In a low-light, partially below-ground room, this was not nice. It felt cold, unwelcoming. That's not how I want my TV room! I want it to be warm and inviting, where me, Rachel, and our guests can curl up under blankets and enjoy our evening's entertainment. We tried a whole host of colors (a very yellow-green, orange, red, fuscia, gold), none of which were we willing to live with. I really wanted to avoid a netural, but the color we picked still manages to be sophisticated, and not feel neutral. I am pleased to introduce to you our palette:


The ribbon company calls it "tornado blue." Weird. Wrights calls the bias tape "mediterranean blue." Much more logical. It looks very peacock blue/green, to me. Does this call for peacock embroidered embellishments on my corset? Absolutely!
For our living room, we have decided, finally to go back to our original thought: grey. Our first greys were very cold, and blue. In a low-light, partially below-ground room, this was not nice. It felt cold, unwelcoming. That's not how I want my TV room! I want it to be warm and inviting, where me, Rachel, and our guests can curl up under blankets and enjoy our evening's entertainment. We tried a whole host of colors (a very yellow-green, orange, red, fuscia, gold), none of which were we willing to live with. I really wanted to avoid a netural, but the color we picked still manages to be sophisticated, and not feel neutral. I am pleased to introduce to you our palette:
We fell in love with this bright, vibrant blue some time ago, and decided to use it to tie the whole house together. We also talked about using flowers as inspiration. The fuschia/red is from an orchid. We have a soft spot for those. It's also great for warming up the room. The blue and white alone would bring the stone back into cool ranges, which we want to avoid.
Rachel also helped me pick out the accent color for my corset.
The ribbon company calls it "tornado blue." Weird. Wrights calls the bias tape "mediterranean blue." Much more logical. It looks very peacock blue/green, to me. Does this call for peacock embroidered embellishments on my corset? Absolutely!
Friday, February 10, 2012
Color Conundrum
I've been working on putting together a tutorial for the hook and needle organizer that I made, but it's rather involved! I think I may have to refer to it whenever I make another, honestly. In the mean time, I thought I would bring you up to speed on the corset progress.
It's got a busk, and grommets down one side. I'm doing the rest this weekend. The next step is trim, but here is where I have a problem. I have no idea what I wanted it to look like! Naturally, I thought about doing it in green. Even went and bought this bias tape.
But I don't like it. At least not against a sea of white. It's too... Easter colored, or too... I don't know. Just not good.
I asked for color suggestions, and got brown and mauve. While both of these are nice, neither really screams me, you know? So I'm stuck.
It's got a busk, and grommets down one side. I'm doing the rest this weekend. The next step is trim, but here is where I have a problem. I have no idea what I wanted it to look like! Naturally, I thought about doing it in green. Even went and bought this bias tape.
But I don't like it. At least not against a sea of white. It's too... Easter colored, or too... I don't know. Just not good.
 |
| photo from Jo-Ann Fabrics |
I did pick up some glorious lace, though! I decided not to go with the wide lace, mostly because I couldn't find any that I liked very well. I got this lovely stuff.
 |
| photo from trimplace.com |
I might weave a bit of ribbon through it, but we'll see. This lace is only about an inch, maybe 1 1/2 inches tall, but it's lovely. So what do you think? Which color would be best on a white corset?
And don't forget to check out the group flickr page.
Subscribe to:
Posts (Atom)