Showing posts with label Goals. Show all posts

Tuesday, December 1, 2015

Landscapes and Atmosphere

It's been about a hundred years since I last posted, but I'm still here!

I'm working really hard to improve my art work, focusing a lot on putting my subjects in a space with some depth, and atmosphere.  I spent about 40 minutes doing this sketch, and it's the first woods scene of my life that actually achieved that.


Drawing from life or photos of scenes has helped a lot.  Especially when it comes to the texture of plants, though I know I've got a long way to go.  For this one, I used the value almost exclusively.  The limited light source really helps you push things into the background. 

Wednesday, October 23, 2013

Sargent's Methods

I've been reading the book John Sargent, by Evan Charteris.  Sargent is one of the greats of portraiture, and my work has been leaning that direction lately, so I've been doing my research.  This book was written shortly after his death, by someone who knew him personally.  It contains statements from his students, and is generally a close look at his life.  Most important, it talks about his methods, not just examines his work.

In the last couple of pages I read, I learned that he preferred to work on the mid tones, and lift the lights and deepen the shadows from there.  Let me tell you, this is a GREAT way to work!  It's my favorite way to work on drawings, in fact.  So why have I never tried that in a painting?  I haven't a clue.  But I'm going to now!  Can't wait to share the results!

I've also recently started posting photos to my Blue Canvas account.  I found it through the magazine first.  It's one of my favorites, and features a wide variety of mediums and styles of art.

Check me out here!

Friday, October 4, 2013

Inducing Creativity

Wednesday night, I went to a concert to see Gypsyhawk and Kadavar.  I was tired, it was a long drive, and we paid $20 to park, thanks to the Cleveland Indians game that night.  It was worth the trip - it always is - and I also had an interesting experience.

While listening to Kadavar, I kind of spaced out.  I found myself closing my eyes, and envisioning a painting I'm developing.  I'm just in the sketch phase, at this point, but I could see it come to life in my mind, and I really wanted to drive the 2.5 hours back home just to work on it.

So was it the laid back, jam-style of the music that stimulated the artsy parts of my brain?  Was it just the late hours that I don't often see, thanks to my work schedule?  Was it just exhaustion?  It warrants some experimentation... on myself....  What can I do to induce the most creative state?

Saturday, August 24, 2013

Watching Paint Dry

I have learned an important lesson.  Not all brands of oil paint have the same dry time.  I had a bit of a false start on a painting, and covered the whole thing with white.  It is a brand new tube, and a brand I hadn't used before.  I expected it to dry in a day or two, but parts of it were soupy after a week!  Wen I've mixed it with other colors, it has dried much more quickly.

In order to finish this painting on time, I'm going to have to add some cobalt drier.  You have to be careful when using drying additives.  If the paint dries too quickly, it can crack.  The additive itself is dark blue-purple, so it can discolor the paint, too.  I'm going to start making test cards just for dry time on new paint!

Unfortunately, there is no way to really accelerate the process.  Oil paint doesn't dry by evaporation like water-based paints do.  Rather, the paint oxidizes, which causes it to solidify.  Once you've got it on canvas, you pretty much just have to wait it out.

I like to have a couple of pieces going at the same time.  I can work on one painting while the others dry, and have them on a sort of rotation.  It also helps each painting stay fresh for me.  It's a system that has treated me very well.

Thursday, August 8, 2013

The Iron Lady

It seems like I need two tries to get these portraits right.  I get no less preactice by painting the same face twice.  That's why s o many artists have zillions of self portraits!

Margaret Thatcher

Saturday, June 29, 2013

The Beholder's Share

One of my favorite painting teachers expressed an idea to me that has always stuck.  He taught us never to include too much detail, and told us that the viewer's brain would fill it in.  (This was complete with optical illusion demonstrations, and lots of science.  Pretty fun, for an intro level art class!)  But the real lesson here is that a work of art needs a viewer, and that the viewer will better appreciate art that includes them.  "Great art is great, because it is ambiguous." 


Saturday, May 4, 2013

Read All About It

There is nothing like making work to improve your skills. Recently, I have found that reading about making art helps a great deal, too. You will find techniques, inspiration, tips. You may get a critique of your work by proxy. It's really quite wonderful.

One of my favorite new resources is Artist Daily. It's a community and forum, but they post lots of great articles. This week included debated tools, pricing tips, and a discussion on why being sociable helps you sell.

Take a look here.

Saturday, April 20, 2013

What Do I Call It?

Lately, most of my energy has been put into fixing up my house.  I mean, dark paneling and hearts-made-of-flowers border are nice and all, but not really my style.  Check out the transformation so far:


Last night, I had some free time and broke out my art brushes.  I paid very close attention to my values this time.  This is something I have struggled with in the past.  The result is a much ore interesting painting than just a likeness.  At least, I think so.


The last step is coming up with a title, which is never much fun for me. I even struggle to title my blog posts.  How do you name things? 


Wednesday, April 17, 2013

Good Online Karma

I learned a little trick about the interwebs from Rachel.  She got her first smart phone in October (I'm still in the dark ages), so natrually, she had to get an instagram account.  The goal: lots and lots of followers.  The purpose:  well, I still haven't really figured that out.  But her strategy makes a lot of sense.

She started taking pictures of the vinyl albums she buys, and tagging them appropriately.  Then, she started liking photos of other peoples' records.  Lo and behold, people who like records started following her!  She did the same thing with a host of other topics, and very, very quickly built up a following of people who liked all the things she posted.  Amazing!

I started to apply the same practice in Etsy, and in no time, I had sales where I had none before!  It's also a great way to build a network of support, of colleagues.

Moral of the story: the best way to get positive attention is to give it!

Sunday, March 10, 2013

Color Experiments in Screenprinting

I did it.  i finally listed some prints I've been hoarding for a while.  It was a fun series of silkscreen prints I did in my last quarter of college.  My teacher encouraged me to keep printing.  Silkscreen is one of the easiest print techniques to pull off at home, you know.

No two prints are exactly alike.  I printed something like 10 big squares of background color, just a couple of each.  Then I printed a couple of each face color on each color of background.  Each fire and brain color was printed on each colorm ariation after that.  The only color present on each is the black.  Looking at them now, I might have arranged my layers differently.  I probably should have found a way to print the black last, for example.  But hey, that's what these experiments are for!

Check them out on Etsy.  One is framed, and 5 of the remaining 6 are posted here.  

Thursday, March 7, 2013

Etsy Overhaul!

I am in the process of giving my Etsy shop a MAJOR facelift!  I went ahead and listed a whole bunch of new things, including some folk style paintings, and a couple of prints.  I'm aiming to get back to my goal of one new item each week! 

Check it out here!

Friday, November 9, 2012

Motorcycle Jacket Love

I have a new painting project, but it's in its very earliest stages.  I'll let you know more once it's gestated a bit.  But the idea behind it is to spread some positivity around, cause we need it.  The world really needs it!

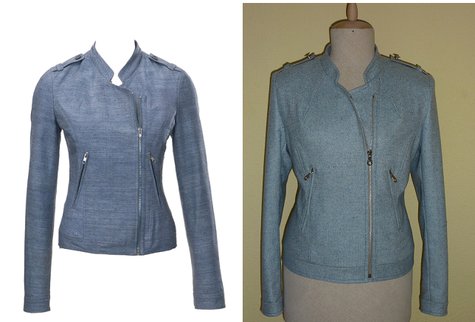
My next sewing project is equally exciting!  I saw this lovely motorcycle style jacket by ttnora, and fell in love.  And was inspired!


Rachel happens to be in the market for a jacket, and I thought this would be perfect, if made from sweatshirt fleece!  That's what the wool reminds me of in these images, and that's probably Rachel's favorite thing to wear.  So, I'm buying the pattern today. :)  Excite!

Monday, November 5, 2012

Ritual Reset

The beauty of having a dedicated work space is that all of your supplies can be out, within arms reach at any time.  You can throw scraps of fabric on the floor, leave your easel set up, leave brushes and paints out, so you don't have to spend an hour prepping for work the next day.  But when the project is complete, things tend to look a little.... chaotic.  I find that this state of disorder makes it nigh on impossible to start a new project.  I get distracted by the mess, or the old thoughts.  To solve this, I have a little ritual I call "resetting."

By reset, I mean clean.  I don't like it, but it helps.  See, I really do like when things are tidy.  The process is not enjoyable, but the result sure is!  So things look nice and fresh and inviting when I go into the studio.  It also clears the residue of the last project, physically and mentally.  Taking a break from the creative process lets my brain rest, or start planning the next project.  And in those difficult starting phases of a new project, there are fewer distractions.

In my last reset, I found some missing nail polish, a box of Redbull, and a couple of missing sketchbooks.  It's like finding treasure!

What sort of rituals have you found in your work?

Friday, October 5, 2012

Making Madness

What have I been making lately?  A lot, actually!  My own deodorant (after a terrible breakout from the one I bought from Lush,) a new purse, a lot of artwork for my friend's movie, a corset for another friend, and food.  Lots of food!  Friend, memories, and plans to travel to NY.  So here's to marathons of crazy busy madness, because sometimes you need it.

Saturday, August 25, 2012

iPad Painting

We finally broke down and boughty an iPad.  It's almost like we're as savvy as people our age are expected to be!  Naturally, we downloaded all the social media apps and games first.  But shortly after, we started the hunt for painting apps.  So, I present to you my first ever iPad painting!


I'm still figuring out how to do everything.  (I'm a PC person.  Shh, don't tell!) I'm super excited to have a reference image provider in my studio now.  I have a sneaking suspicion you may see a lot more posts about art from me now.  I feel really good about that! 
Happy Saturday! 

Tuesday, June 26, 2012

Returning to Paint

So, there was only like... four months between these two photos.  But I'm painting again, and it feels FANTASTIC!  I might be taking a break from sewing.  Or I might just have to finally figure out how to balance them.  Like sew tomorrow night, while this thing is drying.  But painting, it's seriously awesome.  :)


Sunday, June 10, 2012

Finished Blouse - Burdastyle Handbook

Here's my finished blouse!


First, I made a muslin, using the seam tracing technique.  I picked it up from Gretchen Hirsch's Sew Retro class, on Craftsy.   I haven't made that dress yet, but I watched the whole class!


I made my alterations to the pattern (changed it to a V-neck).

I used a lot of basting to keep everything in place while I worked.  This was slippery floaty fabric!


I finished the neckline with an applique stitch, and clipped away the rest of the facing.  You could see the whole thing through the sheer fabric, and that was not pretty.  This is!


And lastly, I learned that there is a reason for black interfacing.  I used white initially, and you could see it.  It looked weird (below).  I removed the cuffs, used black interfacing for new ones, and holy moly, does it look better! 


Many many lessons learned working with sheers.  I'd encourage anyone to give it a try!  Just make sure you buy a little extra fabric.  :)

Friday, June 1, 2012

Studio Makeover

My birthday was on Memorial Day this year. I took a couple of days off (5 day staycation FTW!), and my dad built me shelves for the studio closet as my gift.  Apparently I've become difficult to shop for, but this was a life-changer, people!

I started with two shelves (only two) with space-consuming supports.  I don't have any before photos, as I was way too eager to improve it.  There's plenty of space in this closet, but I had to stack stuff.  That means that if I wanted something on the bottom of the stack, it was a royal pain to get to.  I had a bunch of fabric totes, and figured that 12 inch tall shelves would accommodate either the totes or books, so that I could get rid of the bookshelf.

The sort-of-before.  This is all the shelf space I had.


Dad and I figured out how deep I wanted each shelf and how much lumber we would need.  We used the laser level that my uncle gave me for the first time to mark where each shelf needed to be.  (This closet is not plum or square ANYWHERE!) Two sheets of plywood, a couple of 1x3"s, and a gallon of paint later, I had a bright white closet with lots of shelving!

After - lots of shelves, no more stacking stuff!


Feel free to ignore the cross stitch teddy bear.  I think I made it in middle school.


It took me a couple of days to figure out exactly where I wanted everything.  I have one box of fabric that hasn't made it back into the closet, but that's just more incentive to actually turn it into clothing.  I think most of it is flannel, intended for pajamas, anyway.  I emptied the bookshelf, and rearranged, and well, the studio is about twice as big.  Plus, I can have sewing and painting projects out at the SAME TIME!

The biggest benefit: when cleaning is easy, stuff gets put away!  I think this probably cost my dad about $100 for all the lumber and paint, and it seriously changed my world.

Sunday, May 27, 2012

Woman In Black

Last night, I took the Woman In Black blu-ray to my parents' house, and made them watch it.  (It's fun to scare my mom.  What can I say?)  I decided that this will most likely be my Halloween costume this year.  I've slacked HARD these last couple of years, and I really need to make up for it.  So the 2012 version of the film is set in the Edwardian era, which is roughly 1890 to 1918.  I made an Edwardian corset this winter, which would be perfect to wear under my mourning gown.  Except that I'm not sure what style the Woman In Black's clothing is. 

I've been scouring the interwebs all morning for good images of the costume, but there don't seem to be any.  I found this silhouette from behind, which tells us that the skirt isn't super voluminous, and neither are the sleeves.  From what I can tell (and please correct me if I'm wrong), that points to the Edwardian era.  


But then, there are these, which look more like Victorian clothing to me.


This photo, the adopted parents with Nathaniel, also look like late Victorian clothing. 


The timeline in the story is a little fuzzy, too.  I'm not sure how long ago the woman died.  I might go watch the movie again, to see if I can find dates on the death certificates in the movie.  At least it would give me a solid starting point.  I'd really like to find the costume test shots, but that would decidedly ruin the ghostliness of the Woman, for those who haven't seen the film. 

Tuesday, May 8, 2012

Seams in Sheers

My chosen project from the Burdastyle Handbook is the blouse, and I'm doing it in a sheer fabric.  It's going beautifully, but I should have done a bit of research first.  The seams are not very attractive, and I need to find a way to fix that.  Had I planned ahead properly, I would have found that there are a great number of ways to finish seams in sheer fabric, and that the most preferred is the French Seam.  That involves sewing the pieces with the wrong sides together, which is not what I have done.  So, I'm going to attempt a false French seam with only a 1/2" seam allowance.  It will be slow and tedious, but hopefully the results will be worth it!

The Cutting Class has a very nice illustration of French seams.  I think I'm going to look a little more closely at the rest of their site, too!

Threads has some interesting alternatives that completely hide the seam allowance, leaving nothing more than a tiny band of color in its place.  Kind of wild, really.

And I seem to remember something about adding a flesh colored piece of fabric to the inner side of a seam to hide it, I think from Gretchen Hirsch, but I'm not sure.  If anyone finds that tip, please let me know!

Wish me luck!