Showing posts with label Tools. Show all posts

Thursday, August 8, 2013

Rendr Sketchbook

Because I have been practicing capturing likenesses, I decided that I wanted a sketchbook for that alone.  I've also been using wet mediums much more, so I needed a sketchbook that would allow for that.  Wandering through my local art supply store, I found this Rendr sketchbook, which claims to have no show-through pages.


We all know that traditional sketchbooks cannot begin to claim that.  Rendr achieves it!

Here's the sketch I did of Kelly MacDonald in gouache.  The pages curl, but that can be remedied by just closing the book for a while.  But does the paint show through? 


No.  Not at all!  I'm impressed! 


What other sketchbooks would you recommend for this type of work?  Do you keep sketchbooks for separate subjects?


Sunday, May 26, 2013

Painting with the Shortcut

The other day, I bought an angled brush with a stubby rubber handle, and wished I had done it sooner.  May I introduce to you the Wooster Shortcut.  


I get a nice clean line edging, and the handle is easy on my hand.  It makes for a very fast paint job.  I highly reccomend this, if you're painting your house!  

Wednesday, March 6, 2013

Logos and Free Programs

Designing logos is very specific work.  One must know exactly what to say with a single, iconic image.  I have been working on one for myself for a long time, and I think I've finally got it!  The idea blindsided me yesterday while I was at my day job, waiting for a meeting.  Funny how that happens, isn't it?  I did a nice clean drawing last night.  The only thing left to do is digitize!

My computer with Adobe CS on it happens to be 1,500 miles away at the moment, so I'm looking for free options that might do the trick.  I came across this list of 12 free design programs.  Has anyone tried any of these?  How do they compare to Photoshop, Illustrator, Corel Draw?


Sunday, January 27, 2013

DIY Studio: Screen Exposure Unit

Screen printing is not only amazingly fun and versatile, but one of the easiest print mediums to do from home. There are tons of videos on YouTube on making everything from your actual printing station to vacuum exposure units. Yes, let me repeat that. DIY vacuum exposure units! I think I found a new project for spring!

This one is my favorite so far, but a quick search will yield many versions!


Wednesday, December 26, 2012

Melting Bones

Any decent Victorian garment is going to need bones. I'm making a quick bustier for one (quick is the important word here), so I'm using that plastic boning that comes in a roll. The directions advise that you cut the ends to round them, but I find that it's very difficult to get them smooth. They catch in the casings and are a complete pain. But I tight to myself, there's no reason I couldn't get the help of my friend, Fire!

I removed the bone from its casing, and cut it into a roughly roundish shape.


Hold it in the blue part of the fire for a couple of seconds. If you hold it in the yellow part, it will get sooty. (I learned that in chemistry class. I don't play with fire quite THAT much.)


You'll see the edges start to soften.


While it's still warm, press the end against the table or your finger to smooth it.


Slipping your bones back inside their casings will be a dream!


Saturday, December 8, 2012

Tricks for Tonal Value


For any artist, there are things we can handle instinctively and things we have to think about a little more.  For me, including a full and dynamic range of value takes more time and thought.  Thankfully, I had a painting teacher who was full of fun tricks, who gave me this idea. 

I took a plank of luan, and gessoed one side of it.  I marked the center and taped it off.  I then painted one half of it a middle grey (a 1:1 mix of black and white).  After it was dry, I centered the glass with the wood extending past the glass about 1/2 inch on all sides, and caulked it into place.  This is then what I use as a palette.  As I mix paints, the grey helps me judge the value of these colors.  Everything looks dark against white, so the grey lets me see whether it's on the light or dark side of center. 


The same teacher had other interesting ideas, like
  • Marking a complete value scale on the palette
  • Marking lines or sections by which you could measure paint, to allow for accurate reproduction of mixed colors
  • adding a color wheel to the palette
He takes this analytical approach to mixing paints because he's colorblind.  And you know what?  His paintings are incredible, because of the wonderful range of value. The painting below is a model under satin sheets.  Would you look at that light?!


Another one of his tips was that if you use five evenly spaced values, we will interpret a full range.  Just five.  I try to make my big compositional decisions based on those five values. 

 Thanks, John Stewart!  Take a look at his faculty page on the school's site.  


Monday, November 5, 2012

Ritual Reset

The beauty of having a dedicated work space is that all of your supplies can be out, within arms reach at any time.  You can throw scraps of fabric on the floor, leave your easel set up, leave brushes and paints out, so you don't have to spend an hour prepping for work the next day.  But when the project is complete, things tend to look a little.... chaotic.  I find that this state of disorder makes it nigh on impossible to start a new project.  I get distracted by the mess, or the old thoughts.  To solve this, I have a little ritual I call "resetting."

By reset, I mean clean.  I don't like it, but it helps.  See, I really do like when things are tidy.  The process is not enjoyable, but the result sure is!  So things look nice and fresh and inviting when I go into the studio.  It also clears the residue of the last project, physically and mentally.  Taking a break from the creative process lets my brain rest, or start planning the next project.  And in those difficult starting phases of a new project, there are fewer distractions.

In my last reset, I found some missing nail polish, a box of Redbull, and a couple of missing sketchbooks.  It's like finding treasure!

What sort of rituals have you found in your work?

Monday, October 29, 2012

Three Lessons on Bias Tape

If you've ever sewn anything, you've probably had a need for bias tape.  Making your own creates a lot more options for whatever your purpose is.  I needed to make some to use as bone casing for my friend's corset.  I'd never made it before, but there's never a better time than when you have a very specific need!

I saw a tutorial like this one, that seemed like it would save some work, allowing me to create really long strips of bias tape.

Lesson 1:  when drawing your lines, mark the wrong side!
I marked the right side, and had trouble lining up my marks properly, had to turn the tube to cut it, and found out that well, my lines were not aligned.  *sigh*  I eyeballed it as I cut, and got some decently even strips.

Lesson 2:  Use a low-steam setting on your iron, or get one of those handy little bias tape folders.  I was doing this ally by hand, and earned some steamed fingers.  Ouch!

Once I got all my bias tape made, I realized that I'm going to have a bunch of little seams, that may interfere with inserting the boning.  Not good, but I'll have to make do.  But today, I found this:

Lesson 3:  You don't have to have squares to make the bias tape! 
I was thinking about this as I was cutting up my limited amount of fabric into chunks, but I'm not a math/geometry wiz.  I wasn't going to try anything, not with my fashion fabric, at least.  This one will be mighty handy next time!  Plus, the blog is called The Dread Pirate Rodgers!  Cute pun, great reference, excellent tutorial!

May you take these lessons I learned the hard way, and use them.

Monday, March 19, 2012

Best Spray Paint Ever!

We have been working nonstop on this arcade, and I haven't posted a single photo of it!  It's really Rachel's project, and perhaps that's why.  Rachel let me have a day off yesterday, so I got some much needed errands done.  (I was waaaaaaaay overdue for an oil change.) We bought a phone and dodged a hail storm.  I haven't been to my grandmother's house in a month, and she will soon DIE of grief from it.

So, dear readers, this is the cause of all that:
The Nightmare Arcade.  (That is, Nightmare-like-the-comic themed.  Because everything Rachel is horror and comics.)


We're going back over to the folk's house (AKA workshop) tonight, and I think we'll have most of the physical part finished.  Save maybe drilling all the holes in the control panel top for the buttons.

This thing is a BEAST!

If you ever, EVER need to spray paint something black, or any color, buy Krylon Dual.


We painted a couple of pieces of furniture black before, but never with such ease!  It covers really well, and the way the nozzle is designed makes it easy to press the sprayer button, too, so your finger doesn't die.  Two or three coats = an amazing finish!

Someday I'll get that knitting needle post up.  Until then, buy a can of this, and enjoy!

Monday, January 16, 2012

Building Walls


I finally decided that I've waited enough.  I need to work on this house!  We've had supplies since we bought the place, but life got in the way.  Then, I got intimidated by my lack of construction experience, and not being able to have my dad come help.  His shoulder exploded, you see.  He's had surgery, and is doing rather well now, thankfully!

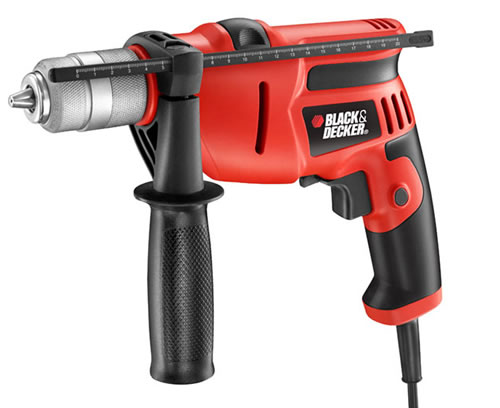
So last night, I asked him if I could borrow his percussion drill.  It looks a lot like this: 

picture courtesy of Sitebox Limited


 The handle is so that you can really put some weight into it.  It's used for drilling into stone, and concrete, which is exactly why I needed it.  I had the day off, so Dad brought it over.  We picked up some masonry screws and a couple other supplies from the hardware store, and set to work.  This was my first framing job, and though it's probably not perfect, and the amount of time it took to get here is laughable, I'm proud.  More than that, I'm really, really glad to see some progress! 


So long, railing at the bottom half of the dining room wall!


Thursday, January 12, 2012

Tailor's Ham - Veggie Friendly!

"What on earth is that?"

That's the first thing I asked my grandmother, when she handed me a tailor's ham, and asked me if I could use it.  They look like this:


Do you see why I was confused?  I took it, because, well that's what you do when your grandmother gives you gifts.  But then, Jo, over at Bridges on the Body started talking about how wonderful they were for pressing curved seams.  That is a pain in the patoot, for sure!  But I still had no idea how it was supposed to help.  So I looked it up.  You do this:
image from coletterie.com


Or this:

image from bridgesonthebody.blogspot.com


Fabric is flat, so making curved shapes with it is a pain.  I finally tried mine for the first time last night, working on the sew-along.  Man, does it make life easier!  I always tried to use the corners of my irnoning board, or pull parts of the fabric up so I could smooth out the curve.  This is MUCH easier!  Who knew?

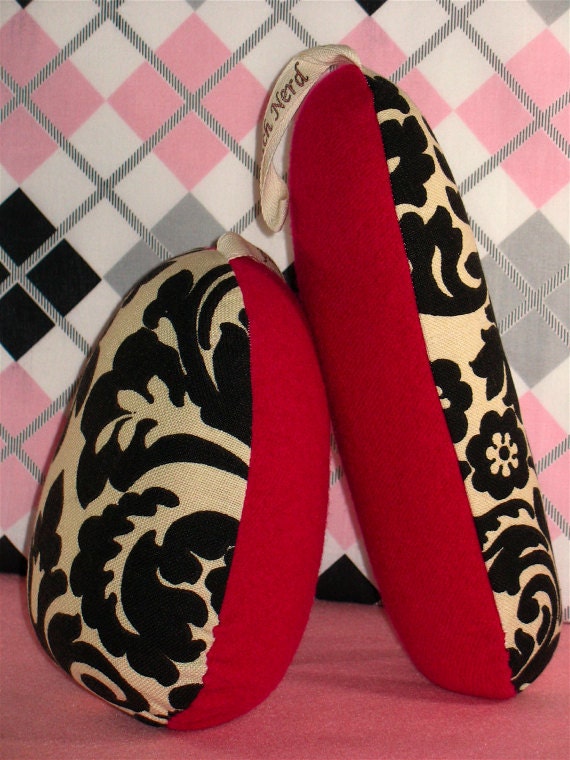
Well, Jo did.  And so did Gertie.  Maybe my grandmother didn't, and that's why she gave away such a valuable tool!  But friends, I'm telling you.  If you sew, and you sew things with curves, you need one!  There are tons of really cute ones out there, too.  Like this one from stitch nerd:


Naturally, it's sold.  But still.  Can you say adorable?  Why not have fun supplies and tools, you know? Especially when they're this handy!

Thursday, January 5, 2012

The Palomino Long Point Pencil Sharpener

If you don't want to spend $2 on a pencil, even if it is a Blackwing 602,  you should try to get one of these pencil sharpeners.  It's one of the strangest things I've ever seen, but it's super nice.

The case, first of all, calls it a "long point" sharpener.  The meaning of that became clearer as I examined this thing.  It has two steps written on the box: "Shape the wood, then the lead."

Shape the wood, then the lead.

Two step shaping.


As you can see, each step is numbered.  The channel for step one is significantly larger than the one for step 2.  At the top, there is a small reservoir type space, that says "STOP."  This was a bit confusing at first, but as you sharpen, the lead extends out the back of the channels, and you stop sharpening when it reaches that line.

1. Shape the wood - the lead is relatively untouched!


Then, using the number 2 channel, you sharpen just the lead.  This leaves you with an extremely precise point, and a lot of exposed lead.  That means you have to sharpen it much less often.  I suppose that's where the extra speed they talk about with the 602 comes from.

2. Then shape the lead.  -  the wood is not touched in this step!


It is vital to have sharp blades for this, and any pencil sharpening endeavor.  To aid in your quest, pencil wielder, Palomino has even provided replacement blades.  Now how about that?!

Open sharpener, with replacement blades!


Thursday, June 30, 2011

I Love the Library!

I've had a library card for about a week and a half.  In that time, I have checked out three books on deep sea life, two on William Morris, one on face painting, two on comic books, and a movie.  This is amazing!  Why didn't I get a library card earlier?

Seriously, people.  And if you're one of those e-book people, you can rent those too! I don't know how that business works.  I'm a paper purist.  But I saw the station.  I know it works.  I love buying books, and I do when I can.  But now I don't have to stop reading because I don't have cash.  If you're lucky enough to have a public library, USE IT!

Thank you for listening to my rant.
Soon, you'll see what I've been putting all this research towards!

Tuesday, June 28, 2011

Home Made Dress Forms

Home Made Dress Forms:

This one's the best duct-tape version I've found.
This one somehow appeals to me more, though.  It's Papier-Mâché, and not pinnable, but more accurate to your shape.

Has anyone tried to do this before?

Bodice Fitting

I just found a rather informative article on how to fit a bodice.  I'll be needing this.  These are some of the trouble I have with fit:


  • Long torso
  • muscular
  • large frame for a woman
  • broad chest
  • full bust
  • small waist
  • wide hips
  • short legs
Needless to say, clothes are always a little wonky on me, but I'm escaping this world, slowly but surely!

Saturday, November 6, 2010

First Yubinuki Thimble Complete!

Well I did it. I finished my first "silk" thimble! It's not pretty, but I'm still proud of it. It works very well. Just to test it, I pushed a needle through the seam of some jeans, and it was no trouble at all. It just doesn't feel as cumbersome as the metal bucket thimbles I'm used to. Hopefully the next one looks better. They'd make wonderful little gifts!

Friday, October 22, 2010

Ancient Art - New Fascination

I just realized that not only do I have a stash of supplies at my apartment, but my old room in my parents' house also has a closet full of stuff.  Oy.  So that means it will take much more time to work through all my stuff before I can justify buying it.  However, that also means there's much more to choose from!  And this could be good, because I just found a new art form/useful tool to try and create.  Thimbles. Ok, not your every day bucket thimbles, but yubinuki.  Any guess as to its origin?  *wink*

How can you resist something functional -that means totally justifiable- and this GORGEOUS?


I can't.
Here's to having two stashes of supplies and all the stuff I need to make hundreds of these suckers!  All you need is some thin bias fabric, paper, and some batting, or even a cotton ball.  Yes people, a cotton ball.  And of course, gorgeous thread.  Traditionally they use silk, but regular embroidery floss will work.  Just consider whether it's twisted, and how much luster it has.  Luster is nice.

Check out Shishi Girl and Ma Mercerie for instructions and ideas, all in English!  I'll let you know if I find more patterns in English, but I might just have to take a few more Japanese courses to get good at this stuff.  Why must I try to do everything I see?

Monday, May 17, 2010

Parasites and Plans

I had fully intended to build my planter boxes this weekend, but that didn't happen. What DID happen was a lot of hanging out with cool people in nature. This was extremely enjoyable! What was not so fun is that there seems to be an abundance of ticks. I'm gonna get made fun of for this post, but I have seriously never found so many in such a short time span. I found three on me - only one bite - and one on the dog. Four, in a four day span. This is probably normal for people who live in the woods and stuff, but I grew up in the suburbs. It's surreal to me. Parasites. *shudder*

I spent yesterday cleaning out the garage, and finally setting up my miter saw that I got a year or two ago. How ridiculous is it to have such a beautiful piece of equipment, and never ever use it? Very. I've got one of these. Isn't it beautiful?

Hopefully I can spend an evening this week building my boxes, and plant my seedlings.

Half of said seedlings have been taken over to Rachel's mom's place, to be planted on the piece of land they've generously offered to let us help tend. I have a lot to learn from Susan (Rachel's mom) and she seems to be eager to teach. I'm stoked! Hopefully it stops raining long enough for the ground to dry out a little. Then, planting! I can't express my excitement for this! I'm probably underestimating the amount of work this will be, and I'm sure plenty of other people are thinking that; However, I was never one deterred by hard work. It will be worth it!