Saturday, January 28, 2012

1911 Corset - In Coutil!

I have to say, I get very excited about each new step in this corset.  I'm already starting to plan for the next one I want to make.  That might be a bit premature, but it's been so much fun!  I want to make one that looks a little less like underwear, more like something I might actually show off. 

Sewing Coutil is interesting.  It feels almost like poster-board.  It's very stiff, and does not stretch.  The crispness of it makes it easy to control. 


I did let one seam get away from me, and had to pick it out.  I've been left with these holes, which aren't incredibly obvious, but bother me nonetheless. 


It's been very much worth the learning experience.  I think I've finally decided on the decorative aspects of this thing, so I'll be gathering up those supplies, too. 


Wednesday, January 25, 2012

1911 Corset Progress

As you know, I have been extremely excited to be part of the 1911 Corset Sew-Along over at Bridges on the Body.  It's been rather educational to look at everyone's work.  We have several experienced corset makers, and some first time sewers (amazingly ambitious ones)!  I managed to fit mine with relatively little trouble, and miraculously no frustration!  Other than the difficulty of getting in and out of the mock-up before the front opens.  (Rachel had to help me more than once.)  This is in no small part because of Jo and other members' advice, and the fact that Jo has broken everything down into such manageable bites.

Here's my ridiculously pansy-covered mock-up. (Thanks Oma, for the million yards of this fabric!)
Second Fitting Front
Front


Second Fitting Back
Back (forgive the self-photo)
Tonight, we cut out the real fabric, and I'm SUPER EXCITED!  I'm also looking forward to to shaping my seam allowances, which seems pretty easy.  Actually, it seems like it should be much more difficult than that.  Anyway, check out everyone's progress on the flickr group's page.

Tuesday, January 24, 2012

Building Walls - Part II

Well, I'm not the best framer, but I'm proud of my work.  I even did some of the drywall ALL BY MYSELF!  That's right folks, no help, but the knowledge I gained from my dear ole dad, and maybe the odd home improvement show.

Take a look at how different everything looks.From the living room, looking into the dining room, we used to see:


Then we took out the paneling, and the railing, and got rid of all the weird little heart shelves, and had ourselves a safety hazard.
Now, we see this!
No more staring at people's feet, under the dining table.  I can't imagine what the designers were thinking on that one....  From upstairs, the view is even more dramatic. 

Before:
Sorry about the clutter.  This was from when we first moved in.  We had a big.  BIG. hole.  

Now:  
That gaping maw is just the entrance to the living room.  We turn on the light by remote (on the half-wall) for now.  

We were able to turn the table sideways, and the dining room feels SO much bigger!  Not to mention, safer.
This all might come together sooner than we think!  But probably not.  


Thursday, January 19, 2012

Love Affair with Sap Green

Sap Green.  Have you ever seen a more perfect color?  It occurs in nature, unlike the weird semi-opaque that viridian tends to be.  It blends much more easily with the rest of your oils because it's nice and transparent.  When painting anything representational, you're a lot more likely to need this color than any other green.  I love mixing my colors, but this is nearly impossible to achieve with other greens. If you don't have this in your palette, put it there.  ASAP.


Image from FineArtAmerica.com

Wednesday, January 18, 2012

Surfaces

The best thing about art is that there are no rules.  You're free to experiment with everything, even how you prepare your painting surface.  My preferred surface is panel; specifically MDF (medium density fiberboard).  It's already smooth, sturdy, and won't warp.  I love the process of getting to know the materials before the actual work begins.  I love graining stones for traditional lithography.  There's something wonderful about the physical act of making.  Is there any wonder why I haven't gone digital?  The problem is that I like a very smooth surface, but I hate sanding.  It's dirty, it's tedious, I tend to scratch as much of me as whatever I'm trying to smooth...  It's just no fun.  So I did a little experimenting, and found a way to avoid it!

I take a big brush to apply just a little gesso at a time, working in a criss cross pattern until it won't spread out any more.  This is a really thin coat, and virtually eliminates brush marks.  Do this until you've covered the whole surface, blending all the while, like Bob Ross would use to lay in his background colors.


Photo from bobrosslove.com

Then start back at the section you first started.  It's probably a little tacky yet, but that's ok.  You'll buff it nice and smooth!  I did about 3 layers in this manner, and let it dry overnight.  It's minimally textured, almost soft to the touch.  I'm very pleased with the results!  Traditional methods be damned.

Monday, January 16, 2012

Building Walls


I finally decided that I've waited enough.  I need to work on this house!  We've had supplies since we bought the place, but life got in the way.  Then, I got intimidated by my lack of construction experience, and not being able to have my dad come help.  His shoulder exploded, you see.  He's had surgery, and is doing rather well now, thankfully!

So last night, I asked him if I could borrow his percussion drill.  It looks a lot like this: 

picture courtesy of Sitebox Limited


 The handle is so that you can really put some weight into it.  It's used for drilling into stone, and concrete, which is exactly why I needed it.  I had the day off, so Dad brought it over.  We picked up some masonry screws and a couple other supplies from the hardware store, and set to work.  This was my first framing job, and though it's probably not perfect, and the amount of time it took to get here is laughable, I'm proud.  More than that, I'm really, really glad to see some progress! 


So long, railing at the bottom half of the dining room wall!


Thursday, January 12, 2012

Tailor's Ham - Veggie Friendly!

"What on earth is that?"

That's the first thing I asked my grandmother, when she handed me a tailor's ham, and asked me if I could use it.  They look like this:


Do you see why I was confused?  I took it, because, well that's what you do when your grandmother gives you gifts.  But then, Jo, over at Bridges on the Body started talking about how wonderful they were for pressing curved seams.  That is a pain in the patoot, for sure!  But I still had no idea how it was supposed to help.  So I looked it up.  You do this:
image from coletterie.com


Or this:

image from bridgesonthebody.blogspot.com


Fabric is flat, so making curved shapes with it is a pain.  I finally tried mine for the first time last night, working on the sew-along.  Man, does it make life easier!  I always tried to use the corners of my irnoning board, or pull parts of the fabric up so I could smooth out the curve.  This is MUCH easier!  Who knew?

Well, Jo did.  And so did Gertie.  Maybe my grandmother didn't, and that's why she gave away such a valuable tool!  But friends, I'm telling you.  If you sew, and you sew things with curves, you need one!  There are tons of really cute ones out there, too.  Like this one from stitch nerd:


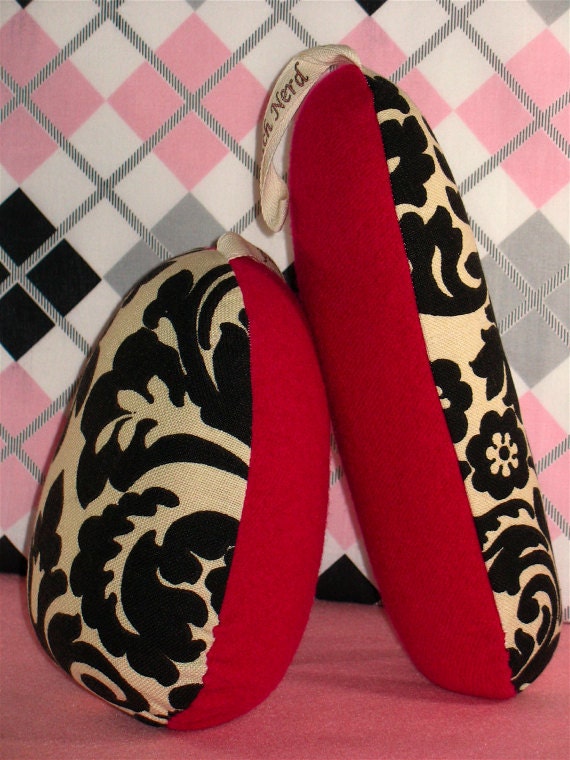
Naturally, it's sold.  But still.  Can you say adorable?  Why not have fun supplies and tools, you know? Especially when they're this handy!

Wednesday, January 11, 2012

Secret Weapon

Something magical has happened to me in the last couple of days.  I'm hyper motivated.  I got home last night, cooked dinner, did all the dishes, worked on my sew-along, did some research, and worked out the composition for my next painting.

I'm back to exercising, although I haven't done it enough to claim to be exercising regularly yet.

But do you know what I think the secret to all this is?  I'm getting enough sleep!  It's amazing!


Monday, January 9, 2012

Making Plans, and You Can Help!

Tonight, I make a muslin for my corset, and make a list of all the wonderful products I can review.  It seems like the internet world enjoys those.  What would you guys like to hear about?  Paint?  Paper? Printing supplies?  Power tools?  Pins?  Pens?  (Sorry, I ran away with the P theme a little...)  This might give me a good reason to go art supply shopping, just so I can have answers for you, and I'm totally ok with that.

Hap-P creating!
(That was bad.  I'm sorry.)

Thursday, January 5, 2012

The Palomino Long Point Pencil Sharpener

If you don't want to spend $2 on a pencil, even if it is a Blackwing 602,  you should try to get one of these pencil sharpeners.  It's one of the strangest things I've ever seen, but it's super nice.

The case, first of all, calls it a "long point" sharpener.  The meaning of that became clearer as I examined this thing.  It has two steps written on the box: "Shape the wood, then the lead."

Shape the wood, then the lead.

Two step shaping.


As you can see, each step is numbered.  The channel for step one is significantly larger than the one for step 2.  At the top, there is a small reservoir type space, that says "STOP."  This was a bit confusing at first, but as you sharpen, the lead extends out the back of the channels, and you stop sharpening when it reaches that line.

1. Shape the wood - the lead is relatively untouched!


Then, using the number 2 channel, you sharpen just the lead.  This leaves you with an extremely precise point, and a lot of exposed lead.  That means you have to sharpen it much less often.  I suppose that's where the extra speed they talk about with the 602 comes from.

2. Then shape the lead.  -  the wood is not touched in this step!


It is vital to have sharp blades for this, and any pencil sharpening endeavor.  To aid in your quest, pencil wielder, Palomino has even provided replacement blades.  Now how about that?!

Open sharpener, with replacement blades!


Wednesday, January 4, 2012

The Palomino Blackwing 602

Once upon a time, there was a pencil.  A very nice pencil.  So nice that when they discontinued it, some people were paying up to $50 for this pencil.  Now, they're making it again.  Rachel got me one with her Klout.

This is apparently a special edition release, just for the Klout folks.  Check it out!

The box, number 271 of 602.  The middle of the Edition.
That's a good thing! :)

Slid off the numbered seal, opened the box
to find black paper and another golden seal. 

Slid off the paper to find a velvet bag.

Blackwing (Black), Blackwing 602 (Grey), refill erasers,
Long Point sharpener, and a handwritten letter:


It's kind of crazy that someone sat around and wrote 602 of these letters, but given the care of the rest of the package, I can't say I'm not impressed.

Rachel kept the 602, as she is the wordsmith.  I kept the regular Blackwing.  I think what makes this pencil so nice is really in the details.  It's made of cedar, so it's easy to sharpen, but sturdy.  The lead is firm, but still very dark.  You get a great line/value variation from just a single pencil. The eraser is an eraser, but it's incredibly nice to be able to change it so easily, and to get the sharp points that its unusual shape offers.  I'd totally spend the $20 for a pack of 12.

The pencil sharpener was one of the strangest things I've ever seen.  I'll show you that tomorrow.

Happy Drawing!