Thursday, October 27, 2011

The Science of Drawing

Since finding some inspiration again, I have resolved to do at least one sketch every day.  I'm not always great with these sorts of rules, but so far, I've held up.  I don't necessarily know where I want to take my work, but I can at least keep my chops up while I work on that.  In order to do that, I've been taking requests, and drawing everything I find.  New friend Harry asked me to draw his cat.  I've never done that before, and it turned out to be more difficult than I expected.  I had to slow down, and pull out the old drawing geometry.  It doesn't involve calculations.  It does involve points and angles.  It will help you get proportions correct, and it is the very reason that I say anyone can learn to draw.

First, find some points that you can connect.  You'll need to make lots of angles from these points, so the more clear they are the better.  Ramona here has three great points that I'll work with: the tip of each ear, and her nose.


Next, connect them by holding up your pencil to your subject matter.  Get a good feel for the angle.  You've probably seen people do this:

This guy is finding the angle and length of some aspect of his subject matter.
Once you know it in your mind, you can draw it 


From there, use these point to fill in other angles.  You'll start to understand the structure of your subject matter as you realize that the line from the nose to the bottom point of the ear also touches the bottom of the eye (blue line).  


Most important, you can find points like the corner of the jaw by using these angles.  For this one, take an existing point, like this tuft of hair at the back of the head, and draw your angle with another point, the chin (red line).  Then I'll use the nose as a starting point again, and find the correct angle out from it to the corner of the jaw.  The intersection is the point of your new feature. You'll find that if you've done it right, it falls in just the right place on the face.  


Keep doing it for all the shaded parts of your subject. This is a very methodical practice, but it works.  It's perfect for proportions that give you trouble!  


Thursday, October 20, 2011

Out of the Rut - Thank You NYCC!

Perhaps a comic convention is not the normal place for a person to find their way out of the creative slump.  However, when you get to meet with well known comic creators, established (and EXTREMELY talented) artists, and hang out in Artist Alley all week, looking at people who do amazing work, it can light a fire under you.  It did for me, anyway.

So I did a little sketch yesterday, to improve upon my background work.  It's a little comic-ier than my normal stuff,  (It's like I only saw comic art for the entire time I was in NY, or something.) but I'm rather pleased with the amount of detail I achieved in a short period of time. I've needed work on backgrounds, environments, landscape, and detail in general for quite some time.  The trees are a little spatially confused, but I'll keep at it, and hopefully see some improvement quickly.  I'm just glad to feel this inspired again!  Hooray!!!

I was drawing from the book Lost Cities from the Ancient World.  Here's my pencil sketch, for your enjoyment.  Critique is welcome.
Pyramid at Palenque

Tuesday, October 18, 2011

Converting (Lose the Sleeves!)

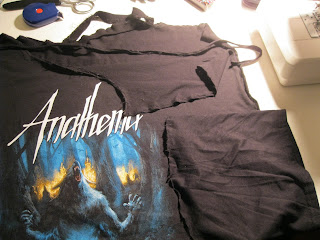
Everybody has a favorite t-shirt, whether it's funny, or has their favorite band, etc.  Well, Rachel has quite a collection, but being the stylish lady that she is, wanted something cuter to wear.  In preparation for New York Comic Con, she asked me to take an Anathema shirt and turn it into a v-neck.  Here's what I did.

First, we decided where she wanted the neckline to fall.  She likes a deep V, and wanted to make it about 4 inches lower than the natural neckline of the shirt.  No problem, except for that would have cut into the logo.  My logo.  So that wasn't happening. :)  I decided I would lower the neckline by turning it into a tank, and using the sleeves to add the extra length to the straps.

Second, I deconstructed the shirt.  With the aid of my handy dandy seam ripper and a good cooking show, I now had a tube of a shirt, and some weird scraps of ribbing, etc.


Then, I found the center of the neckline, and traced out the lovely V.


I used a tank of mine to determine what to do with the back, and decided to basically leave it where it was.  I added the sleeve material directly to the back.


Here's where I made Rachel try it on a bunch.  We figured out exactly how the neckline needed to lay, and pinned it in place.  I sewed it up.  Then, I used the tank of mine to trace the armhole.

                                
But I realized that it was hanging all wonky because I had lowered the front of the shirt. (Wonky is the technical term for lower in the front than the back.) That, plus the fact that the original arm hole protruded, and made for a very weird side seam.

Side seam with new arm hole (left) and original arm hole (right).  
I came to the conclusion that I had to split the sides.  I had been trying to avoid this, but I couldn't find a way around it in the time that I had.  (I'm still working on it.) So I split the sides (taking probably a foot out of the circumference of this 3x tee), sewed them back together, trimmed the bottom hem, re-hemmed, and finished off the arm holes.  It's pretty dang cute, if I may say so! 

Zig-zag stretch stitch.  I really liked the less-finished look of this one.


Finally, the exclusive Anathema v-neck tank!


By the time I get through converting Rachel's wardrobe of band t-shirts into cuter ones, I'll have this system down pat!